
Issue Polygon ID Credentials With Dock in Minutes

Dock is the first SaaS platform that allows you to integrate Verifiable Credentials from Polygon. Developers can do the initial setup to issuing their first Verifiable Credential on Polygon in minutes without needing to build any infrastructure.
This collaboration between Dock and Polygon paves the way for widespread adoption of Verifiable Credentials by equipping developers with tools to facilitate trusted and secure relationships between apps and users. People can store and manage Verifiable Credentials off-chain with a compatible Polygon ID wallet app.
Dock and Polygon’s technology are built on the principles of Self-Sovereign Identity, which is a concept of individuals having full control and ownership over their personal information and digital identity. It empowers people to manage their data without relying on centralized authorities or third-party services.
Dock’s platform has a suite of tools that enables:
- Users to prove their identity without exposing their private information
- Organizations to issue efficiently issue Verifiable Credentials
- Organizations to verify credentials instantly

Developers Can Build Polygon-Based Identity Features and Apps Faster and Easier
Dock’s integration of Polygon ID enables developers to:
- Convert user data into fraud-proof and instantly Verifiable Credentials
- Create decentralized identifiers (DIDs) on the Polygon blockchain
- Issue Polygon-based Verifiable Credentials in as little as 2 API calls (create a DID and issue a credential)
- Import credentials to Polygon-based ID wallets
- Accelerate implementations with easy integrations without complex code
- Speed up the app building process to get faster to market
Apps and services can validate the authenticity of these credentials in seconds, which eliminates expensive, time-consuming, and manual verification processes.

Providing Privacy Using Zero-Knowledge Proofs (ZKPs)
All Polygon credentials use Zero-Knowledge-Proof technology. ZKP is a method that allows you to prove a claim without revealing the actual data to support the claim.
Example of Zero-Knowledge Proof applications:
- Authenticating online users without revealing their identity
- Validate online votes without revealing who voted for what option
- Proving that their salary is high enough to qualify for loan applications to the bank
Technology Architecture and Credential Issuance Flow
Architecture of Dock and Polygon’s Technology

Credential Issuance Steps

- Issuer: Creates a credential request template using the Dock API
- Issuer: Displays “Authenticate with PolygonID” QR code to the holder
- Holder scans the QR Code: Initiates the claim flow
- Dock API: Returns the “Claim Credential” QR code
- Issuer: Displays the “Claim Credential” QR code
- Holder: Scans the QR Code and the request is sent to the Dock API which issues PolygonID credential
- Holder: Digital wallet receives the Verifiable Credential

Steps to Issue a Polygon ID Credential Using the Dock Certs Web App
Everything that can be done on the Dock Web App can also be done on the API.
1. Login to Dock Certs and create a Polygon ID profile by clicking on Issuer Profiles and Create Issuer Profile.

2. Add a logo, description (optional), and under DID Type, select polygonid. Then select Create Issuer Profile.
Important: If you want to issue a Polygon ID credential, you must have a Polygon ID Issuer profile first.

3. Now you can see the Polygon ID DID issuer profile.

4. Once you’ve created your issuer profile, you need to create a template from Polygon ID schemas. You have the option to import a template. Click on Templates and select Create template.

5. Click Import JSON-Schema.

6. For this example, we’ll use this KYC Age Credential.

7. It automatically fills in all of the fields. Once the fields are set up the way you want, click Publish.

8. Now you can see the template.

9. Select Credentials and Issue credentials.

10. Select the KYC AgeCredential template.

11. For this example, we’ll continue to issue a credential without a design.

12. Make sure you are issuing from a Polygon ID profile by selecting it under DID Type.

13. Add the details by clicking Add Manually. For more details about all of the issuing features on this page, check out this Issuer Guide.

14. Enter the recipient’s details. If you want to send the credential directly to their wallet, you can request the information by checking the box Request Info. Once all of the details are entered, select Add Recipient.

15. Select Next.

16. Since we are not going to send the recipient an email, select Continue without.


After closing this window, select Yep, I’ve got it.
17. The credential hasn’t been issued just yet. It’s a two-step process with Polygon ID to get a credential into the Polygon ID wallet (Apple and Android).
a) First, the credential holder will need to authenticate and connect to the issuer by scanning the QR code that we will show you in the next steps.
b) The second step is to claim the credential to get it in the Polygon ID wallet.
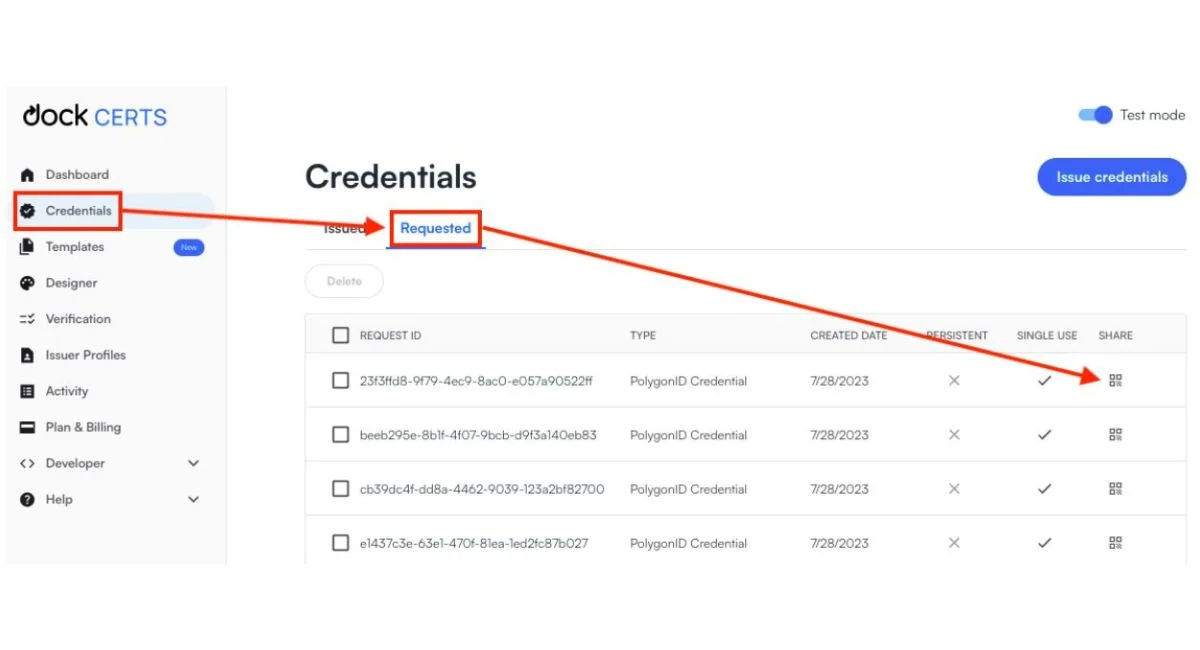
In Credentials, click Requested, and click the Share icon to get the URL to the credential holder.
18. Copy the link by clicking on the copy icon and you can see the QR code when you open it in your browser. The issuer will send this QR code to the credential holder however they choose.

18. If the credential was issued in test mode on Dock, the credential holder has to ensure that their Polygon ID wallet network is set to testnet as well, which is called Polygon Mumbai. If the credential was issued in production mode in Dock, the credential holder has to receive it on the mainnet network, which is called Polygon Main. Holders can switch the network by tapping on the settings icon, the current network name, and choose the network they want.


19. The credential holder uses their Polygon ID Wallet to scan the QR code to get authorized and connect to the issuer. The screen on the right is the phone app screen. Select Connect on the phone app.

20. After you enter the wallet PIN, it will start authenticating.

21. Once you’re authenticated, the QR code changes to a new QR code called Claim Credential. Scan this new QR code, enter the PIN, and the credential will appear in the wallet.

22. After the Claim Credential QR code is scanned, the holder taps Accept, and enters their PIN to receive the credential in the wallet.

23. The credential is added to the wallet.


Key Terms and Concepts
Self-Sovereign Identity (SSI)

In digital identity management, Self-Sovereign Identity allows individuals to control their own identity, rather than having their identity held by a centralized authority. The three pillars of SSI are Verifiable Credentials, blockchain, and decentralized identifiers (DIDs).
Verifiable Credentials

A Verifiable Credential is a digital document that contains certain claims or statements about a person, object, or entity. They are like digital versions of physical documents but with added security and flexibility.
These are just a few of many examples of documents that can be used as Verifiable Credentials:
- Employment certifications
- Professional association memberships
- Driver’s licenses
- Educational degrees
Main Parties in a Verifiable Credential System
1) Issuer
This is the entity that creates the digital credential. It could be a government institution issuing a digital passport, a university issuing a digital diploma, or a company issuing a digital employee ID. Essentially, it's the “source of truth” that says, "Yes, this digital identity is valid and the information it contains is true."
2) Holder
This is the person (or entity) who owns the identity. As a holder, you control your digital identity and credentials securely. Only you decide who you want to share them with whenever you want to.
3) Verifier
The verifier is the party who checks or verifies the identity. Let's say you're at an airport and you show your digital passport on your phone. The airport security would be the verifier. They would check that your digital passport is valid, usually by using cryptographic proofs, without needing to check with the original issuer. This speeds up the process and enhances privacy, since your data doesn't need to be constantly shared with different organizations.
Decentralized Identifier (DID)
A decentralized identifier is a globally unique identifier that is not controlled by any central authority. Instead, it's created and managed by the individual or entity to whom it belongs. It's like having your own digital ID card that you control and can use across different platforms and services.
Example of a Polygon DID:
did:polygonid:polygon:mumbai:2qDiW1e8URH5Dej9Zhybs3LuKaYhmiJDrKFJZgVawS
DIDs use a combination of cryptography and blockchain technology to ensure security and integrity. They enable you to authenticate yourself and prove your identity without revealing more information than necessary. DIDs can be used for various purposes, such as securely accessing online services, managing personal data, and establishing trust in digital interactions.


